In Kenya, fast internet is key to staying connected. When Starlink stops working, it’s a big problem. You might be in the middle of a call or watching your favorite show when it drops.
Being offline is frustrating, but there’s no need to panic. Most problems have simple fixes you can do at home. This guide will show you seven easy steps to get your signal back.
We aim to make solving these issues easy for you. If your equipment still doesn’t work after trying these tips, we’re here to help. Contact us at (+254)113 22 9993 or email [email protected] for expert advice. Let’s get your network working again so you can focus on what’s important.
Why Your Starlink Is Offline
When your Starlink connection drops, it can be really frustrating. This is true whether you’re in a busy city or a remote area in Kenya. Knowing the signs of a service drop helps keep your connection stable.
Many things can cause these outages. This includes severe weather or small technical problems. Finding the cause early helps fix Starlink issues before they get worse. This keeps your place connected without delays.
Weather and physical barriers can affect your signal. Heavy rain, thick clouds, or trees can block the signal. Also, internal errors or loose cables can cause your system to show an offline status.
Issue Type
Common Cause
Impact Level
Environmental
Heavy Rainfall
Temporary
Physical
Blocked View
Persistent
Technical
Firmware Glitch
Variable
Hardware
Loose Cable
Critical
Understanding these basics is key to a reliable satellite internet experience. Knowing what to look for helps fix Starlink problems fast. Keeping your equipment in good shape prevents future issues.
Check Your Physical Cable Connections
Before you worry about your hardware, check your Starlink cable. A loose or damaged connection often causes an offline error. It’s important to keep your setup in good shape.
First, look at the cable from your dish to the router. Make sure the connector is well-plugged into the port. Sometimes, movement or weather can make the plug come loose.
Check the wire for any damage like fraying or bites from animals. Even a small scratch can mess up your Starlink signal. If you see damage, the connection might not work right.
Use the table below to find and fix common connection issues at home.
Issue Type
Visual Sign
Recommended Action
Loose Connector
Plug is not flush with the port
Push firmly until it clicks
Cable Fraying
Exposed inner wiring
Replace the damaged cable
Corrosion
Discoloration on metal pins
Clean gently or contact support
Sharp Kinks
Visible bends or creases
Straighten carefully to avoid breaks
Be gentle when checking your equipment. If your Starlink still doesn’t work after checking connections, look for other problems. Keeping your cables in good shape means faster and more reliable internet.
Power Cycling Your Starlink Hardware
Power cycling is a simple way to fix Starlink problems at home. It works by clearing out temporary errors that cause drops in service. You don’t need to be a tech expert to use this method.
To start, safely turn off your equipment. Here’s how to do it right:
Waiting 20 minutes is key. It lets your Starlink hardware fully discharge. This ensures your router can start fresh and connect to the satellite network again.
After waiting, plug the power cable back in. Your system will reboot, which might take a few minutes. This easy step is a key part of fixing Starlink problems and often solves them on its own.
Analyzing Obstructions and Signal Interference
If your Starlink is acting up, the problem might be right in front of you. Your system needs a clear view of the sky to work well. Even small things like branches or nearby buildings can mess with your Starlink signal.
Using the official mobile app is the best way to find these problems. Open the app and go to the “Visibility” tool. This tool uses your phone’s camera to show you any blockages like trees or buildings.
After the scan, you’ll see a map of obstructions. Red areas show where your dish is blocked. If you see a lot of red, moving your dish to a better spot is a good idea. A rooftop or open land can help a lot.
Knowing what causes interference helps you make smart choices about where to put your Starlink. The table below shows how different things can affect your connection.
Obstruction Type
Impact Level
Recommended Action
Tall Trees
High
Trim branches or relocate dish
Nearby Buildings
High
Mount dish on a higher pole
Power Lines
Medium
Shift position slightly
Heavy Rain/Fog
Low
Wait for weather to clear
Fixing these environmental issues is key to a good connection. Keeping your view of the sky clear helps your Starlink work its best. Regular checks with the app will help you stay on top of any changes.
Verifying Your Starlink Offline Status via the App
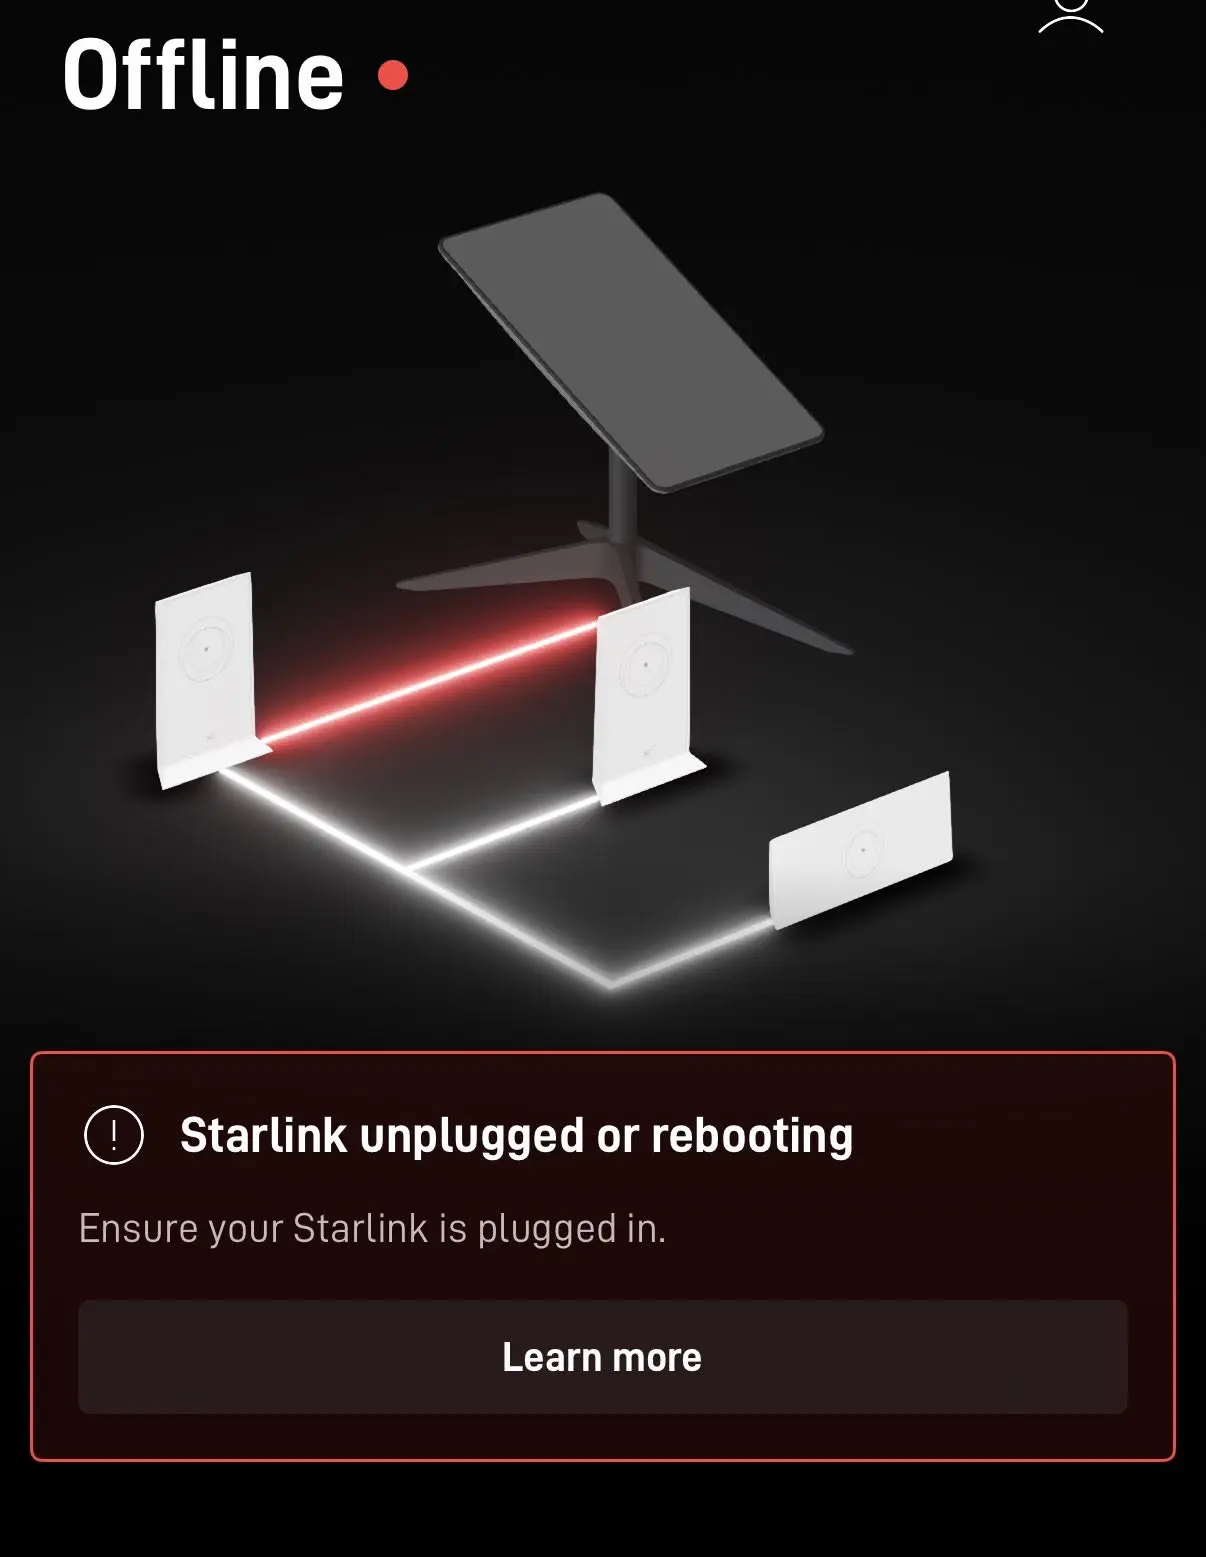
When your Starlink goes offline, the mobile app is your go-to for fixing issues. It gives you a clear view of your satellite’s health. Just open the app to see if it’s a signal problem or a hardware issue.
The app’s dashboard shows error codes in real-time. Look for the “Advanced” section in settings for detailed reports. These reports can tell you if it’s a local problem or a wider network issue in Kenya.
“Effective troubleshooting begins with accurate data; your app is the bridge between complex satellite technology and simple, actionable solutions.”
Using the Starlink app helps you decide what to do before you start troubleshooting. Below is a table that explains common status messages you might see.
Status Message
Likely Cause
Recommended Action
Disconnected
Cable issue
Check all physical plugs
Searching
Obstructions
Clear view of the sky
Booting
Power cycle
Wait for system restart
Offline
Network outage
Check local service alerts
After finding the error code, follow the steps the app gives you. This method saves time and avoids unnecessary repairs. Make sure your phone is connected to the router’s Wi-Fi for the best results.
Updating Your Starlink Firmware
Updating your Starlink can fix many connectivity issues. Old software can cause service drops and compatibility issues. Keeping your system updated ensures the best connection.
The Starlink firmware updates automatically during quiet hours. But, if your system is offline for a long time, it might miss these updates. You can check your software version by opening the Starlink app on your phone.
In the app’s settings menu, you can see your device info. If an update is ready, the system will ask you to install it. This keeps your internet fast and reliable.
Feature
Outdated Firmware
Updated Firmware
Connection Stability
Frequent drops
High reliability
Performance
Slow speeds
Optimized throughput
Security
Vulnerable
Fully protected
Compatibility
Limited
Full feature access
Regular updates prevent service problems. By keeping up with updates, you get the most from your Starlink. If your system stays offline, try other fixes to get it working again.
Resetting Your Starlink Router to Factory Settings
At times, the only way to fix a stubborn connection is to start over with a factory reset. If you’ve tried everything else, this step can often solve problems that keep your signal from working. It clears out any bad data that might be slowing you down.
Before starting, make sure to save any custom network settings you’ve made. A Starlink factory reset will erase your Wi-Fi name and password. You’ll need to set up your network again after it’s done.
To reset your Starlink router, power cycle it six times fast. Unplug the power cord and plug it back in right away. After the sixth time, the router will reset to its factory settings.
“Patience is the most important tool in your technical kit when dealing with complex network hardware.”
— Anonymous Tech Expert
The table below shows what happens when you switch back to the factory settings.
Feature
Before Reset
After Reset
Network Name (SSID)
Custom Name
Default Starlink Name
Wi-Fi Password
Personalized
None (Open)
Configuration Data
Stored User Settings
Cleared/Default
Connection Status
Error/Offline
Ready for Setup
After the reset, use the official app to set up your connection again. This step usually fixes your internet connection for good.
Inspecting Hardware for Weather Damage
Extreme weather can harm your outdoor setup. In Kenya, heavy rains, strong winds, and intense sun can cause Starlink outages.
Do a thorough visual check if you face connectivity issues. Look at the dish for cracks or water signs from storms.
Also, check your mount and cables for wear. When checking your Starlink gear, watch for these damage signs:
Frayed or exposed wiring from wind.
Debris marks on the dish.
Corrosion or rust on brackets.
Loose connections from high winds.
Significant damage means you should not try to fix it yourself. Reach out to professional support to keep your Starlink safe and working. Keeping your equipment in good shape is key for reliable internet.
Contacting Professional Support for Persistent Issues
If you’ve tried everything and your Starlink internet is still down, it’s time to call the experts. Sometimes, technical problems need a closer look from someone who knows your setup well.
Professional Starlink support is the next step when you can’t fix it yourself. We’re here to help you get back online quickly through our expert services.
How to Contact Us via Phone at (+254)113 22 9993
Call our team at (+254)113 22 9993. Our friendly staff is ready to help and guide you. Have your account details ready to speed up the process.
Email your detailed diagnostic logs to [email protected] for a deeper review. These logs help us find the exact problem. After we get your info, we’ll find a precise solution for you.
Optimizing Your Starlink Placement for Better Performance
Getting the best out of Starlink starts with where you put your dish. It needs a clear view of the sky to talk to satellites. Even small things like branches or nearby buildings can mess up your signal.
For the best connection, put your unit on a rooftop or a tall pole. These spots help you avoid problems that come up in homes. By keeping your dish high, you make sure it stays connected without losing signal.
Don’t forget about your cable runs. Short cables mean less chance of signal loss or damage. Also, keep your gear away from big metal things or power lines. These can mess with your Starlink signal.
Mounting Location
Signal Quality
Installation Difficulty
Ground Level
Low
Easy
Wall Mount
Medium
Moderate
Rooftop/Pole
High
Advanced
Spending time to set up your Starlink right means better internet at home or work. A well-placed dish is key for a smooth online experience. Follow these tips for faster speeds and fewer problems every day.
Preventing Future Connectivity Disruptions
To keep your Starlink connection stable, you need to take care of your hardware. Spending a little time on maintenance can prevent sudden outages. Regular upkeep keeps your system running smoothly and efficiently.
Begin by setting up a check-up routine every few months. During these times, clean your dish from debris, leaves, or bird droppings that could block the signal. Also, check your cables for any damage, fraying, or loose connections.
Watching your network usage is also key to a smooth Starlink experience. Use the app to spot any usage patterns that might cause congestion or slow performance. Knowing your data habits helps you manage your bandwidth better.
Lastly, always update your software to the newest version. Updates often fix bugs and improve system stability. By following these steps, you’ll save a lot of time and effort in the long run.
Clean your dish surface regularly to prevent signal blockage.
Check all cable connections for physical damage or corrosion.
Enable automatic updates in your settings to stay current.
Monitor your network traffic through the official app.
Final thoughts
Having a stable internet connection is key for your daily life in Kenya. Learning how to fix Starlink issues helps you handle your equipment with ease.
You can now spot and solve common problems. Regular upkeep keeps your Starlink system working well for your home or office.
If your equipment still doesn’t work, contact official support. Good internet access opens up the world and makes communication smooth.
Update your software and keep your hardware clean to avoid issues. Enjoy fast internet every day with your satellite connection.
FAQ
What should I do first if my Starlink shows an offline status?
First, check the physical connections. Make sure the Starlink cable is well connected to both the dish and the router. If everything looks good, try unplugging your hardware for 30 seconds. Then, plug it back in to fix any temporary issues.
How can I get professional help if I cannot resolve the connectivity issue myself?
If you’ve tried the basic fixes and still have issues, contact WiFi Mtaani for expert help. Call us at (+254)113 22 9993 or email [email protected] with your diagnostic details. We’ll get you online quickly.
How does the Starlink app help me troubleshoot an offline error?
The Starlink app has a diagnostic dashboard. It shows real-time data on your system’s health. You can see error codes, check for obstructions, and find out if it’s a local problem or a network issue in Kenya.
Will heavy rain or wind in Kenya cause my Starlink to go offline?
Yes, bad weather can cause signal problems or damage. Check your dish and cables for water or debris after a storm. Make sure your dish is securely mounted to withstand wind.
Why is it necessary to update my Starlink firmware regularly?
SpaceX updates firmware to improve performance and fix bugs. Outdated software can cause latency or drops. Keeping your system updated ensures a reliable connection.
A factory reset is safe and can fix signal issues. It resets your router to its original settings. You’ll need to set up your network again, but it’s a good fix for software problems.
How can I optimize my Starlink placement to prevent future service interruptions?
To keep a strong connection, make sure your dish has a clear view of the sky. Use the Starlink app to check for obstructions. Move your dish to a higher spot, like a roof, to avoid blockages.
What information should I provide when contacting WiFi Mtaani for support?
When contacting us, share your system status and any error codes. Email these to [email protected] or call (+254)113 22 9993. Our technicians will guide you through troubleshooting.












No Comments